June 20, 2012

Mattresses!


One of the best parts about building this trailer was knowing that I would be able to sleep on something thicker that the ½” thick ‘air mattress’ we use for camping now.  Granted they are better than nothing and when you can’t bring anything larger they are great!  But as a side sleeper I wanted something more comfortable.

We ended up buying two sheets of 24”W x 90”L x 5” thick foam from Joann Fabrics.  This was defiantly one of our more pricy purchases – I think it was about $80 per yard.  But luckily we had access to a 40% off coupon which helped lessen the blow.  We also tested it out in the store so we knew that it would be really comfortable and worth the price for a good night sleep! 

Since we have the recessed storage in the floor of the cabin, we knew that it would be better to have three or four smaller mattresses that could be easily moved around to access the doors.  With the size foam we ended up purchasing, all I had to do was cut the two sheets in half and this gave us four sections of foam that measured 24”W x 45”L x 5” thick. Three of these halves fit the length of the cabin perfectly.  It leaves us with one leftover piece of foam, but I’m sure we’ll find use for it somewhere.


Even though I figured we would be using sheets and blankets in the cabin for the trip, I wanted to make some removable covers for the mattresses to protect the foam.  They needed to be made of a durable, washable material that would hold up to being on the road and moved around.  After another trip to Joann’s, we decided to use duck cloth which is a 100% cotton, heavy weight canvas – we purchased the rest of the bolt which was a bit more than 6 yards.  We also bought 48” long dual-separating parka zippers which are ‘sport-weight’ zippers which were heavy duty and, most important, long enough for what we wanted to do! 

My plan was to basically make a simple box cushion with a zipper running along one of the long edges.  I thought using the long edge would not only make the cover easier to get on and off, but also keep the zipper away from the wood floor and us.  Though I have some sewing experience, it was usually with my very experienced Mom helping me or at least within shouting distance.  This time I was on my own and she wasn’t even reachable by phone (they were on vacation in Spain when I decided to tackle this).  So I turned to the internet and found these posts; Honeybear Lane and this post, AlternativeWindows that were invaluable.  I was able to mush these two instructions together in my head to make my covers.  This is my first attempt at writing any type of sewing instructions but I will do my best and add lots of photos!

First I cut the fabric to the sizes I needed for my foam.  I basically added 1” to every length to be able to give myself a ¾” seam allowance when I sewed everything together (this meant that I would have a ¼” of wiggle room all the way around in case I really screwed something up).  So what I ended up with were:
·         (2) 26” x 47” pieces for the top and bottom
·         (2) 5” x 26” pieces for the two short ends
·         (1) 7” x 47” piece for one of the long sides
·         (1) 7” x 48” piece cut down the middle (so there would be two 3 ½” strips) for the long end with the zipper


I started by sewing the zipper because this was the scariest part in my mind – I’ve never sewn anything with a zipper!  Luckily Honeybear Lane also linked to a zipper tutorial that was extremely helpful which I will paraphrase.  I pinned the zipper to the first strip of fabric with the zipper facing down.  I used the zipper foot attachment and played with the needle position until I got it close to the teeth while allowing the zipper pull to still get by with the needle down.  This is important because in order to keep the zipper flat while you are sewing, you start with the zipper open.  Then after you have sewn a bit, you lift the presser foot while the needle is in the fabric, carefully pull the zipper past the needle, lower the presser foot and keep sewing.  After you are done, you flip over the zipper and press it down.  Huzza! One side done!  The second side was done with the same process.  


I then top stitched along the zipper as my tutorial suggested.  This was a little more complicated for me because I can’t sew straight unless I can line my fabric up with something.  What I did was to put a piece of tape on my machine that I could line the teeth of the zipper up to.  This gave me about an 1/8” from the edge of the fabric along the zipper to where I was sewing.


Wahoo!  Now on to the rest of the cushion…  The next part was really easy.  I sewed the two short strips onto the long edge strip with a ¾” seam allowance.  Make sure that you leave ¾” open at either end of this seam so that you can easily pin the finished ring to the top and bottom pieces (I missed this step on my first cushion and had to rip out a lot of stitches!).  This gives you one long side strip.   Note: before I sewed the strips together, I switched back to my normal presser foot from the zipper foot attachment.  


Since my zipper was two inches longer than the long edge of my cushion, I knew I would have to wrap the edges of the mattress with the zipper.  Luckily this is what was done in the tutorial I was following.  As she wrapped the corner with the zipper, it ended in a pocket on the short edge of the cushion – which was easier that it sounds.  After doing a mockup on the foam, I found I had 1½” to play with on each of the short edges to make the pocket.  I first folded over one edge ¼” and sewed it straight across to finish the edge.  I then folded again 1¼” and pressed it in place with the iron.


 I pinned the piece with the zipper to the folded fabric so the zipper was facing down.  This is where I had to vary from the tutorial.  My zipper has the ability to completely unzip, so instead of sewing straight across, I only sewed up to the edge of the zipper.  I also sewed back and forth over the same spot a few times to make the seam extra strong.


After repeating this on the other side I ended up with one continuous strip.  Now it was time to pin the edge ring to one of the sides.  I made sure that the finish side of the ring was facing in because you are basically sewing the cushion inside out.  This took a bit of time and thought, especially at the rounded corners, as I was trying to get everything evenly spaced.  

pinning away!


After everything was pinned I sewed around the perimeter with the same ¾” seam allowance.  At the rounded corners I tried to maintain the ¾” allowance by following the rounded corner and not the square corner.  This would be cut off later.  


Now for a quick test fit before pinning the other side. 


I then took a 20 minute brake to have a photo shoot with my cat who seemed to love sprawling across the fabric… I guess she likes duck cloth?  Either way she was very cute!


After the other side was sewn on, I cleaned up the edges and trimmed off all of the extra thread.  One thing I noticed with the duck cloth was that the unfinished edges would unravel really easily.  What I might do later is go over all the edges with fray check – unfortunately I ran out and what I had left was really old.  After everything was cleaned up I turned the cover right side out, ironed it and was amazed with what I did!  They came out far better than I thought they would and I’m really happy with the results!


kitty approved!

And they look great in the trailer!


Rebecca approved!

June 19, 2012

The Whiskey Barrel

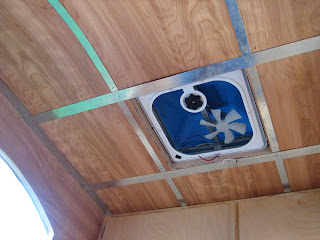
The last step to finishing up the interior cabin was to cover up the gaps and seams that were left when we installed the interior skin.  We also wanted to cover up all of the screws that we used to secure it to to the spars, or at least make it look more intentional.

The gaps left after installation and visible screw heads

Because we were planning on using aluminum trim around the doors and galley hatch, we though the easiest solution would be to carry on with that them.  Another thought, was to find a metal that was actually magnetic so that it would allow us to hang things from the trim - it could be attractive and functional.  Darrell ended up finding a sheet of galvanized thin gauge steel that he cut into 1 1/2" wide and 1" wide strips.  The 1 1/2" wide strips were sized to cover the larger seams and side gaps.  The 1" wide strips were perfect to cover up the exposed screw heads.


After cutting the strips to the length needed, we used a file to smooth the edges and then pre-drilled holes at the attachment points.  We attached the metal strips to the plywood using construction adhesive and twist nails.  These were perfect, not only because the spiral flutes would prevent the nails from working themselves out, but the heads were actually rounded which added a nice detail.


The finished product covered everything up perfectly and really gave the interior a custom look.  Darrell says it looks like a wine barrel, but I think a whiskey barrel is a cooler description :)

Note: To install the trim more easily, we took off the reading lights, but they had already been wired so we left them hanging for the time being.  Hopefully they will be put back soon!

June 14, 2012

Side Doors

So since we've shown you that the doors have been started in our post about finishing the exterior walls, I guess its time to explain the process!  To begin with, when we cut out the door openings from the Okoume side walls, we did so as carefully as possible and saved the pieces.  In this way the completed doors would fit in seamlessly with the grain and the openings.  A key thing to note too is that i lightly marked which panel went with which wall and faced out.

The framed out walls and saved door pieces from back in the day!

The next step was to frame out the door in the same manner as the side walls - sandwich style.  We wanted to insulated the doors as well because we figured that this would give us a nice warm cabin once they were assembled and everything was sealed.  I framed out the sides and bottom of the door with 1x2 pine and cut down the arched top piece from a larger 1x4 board.  I then used the 1x2 pine again to frame out an opening for the window.  We were able to purchase these inexpensive operable screened windows online that were originally made for horse trailers.  While not the most attractive in the world, the were the right size, type and price.


I next traced out the opening for the window and drilled holes in each corner to make it easer to cut out with the jig saw.  It actually was quite difficult to cut out due to the awkward position and curves, but in the end, with some light sanding it fit like a glove.


After framing out the door, we used the leftover R-4 foam insulation from the walls to insulate the door.  It worked out great because we used up exactly what we had left!  Its like we planned it!


Just like with the Okoume, when we cut out the openings in the 1/4" birch plywood we used at the interior, we marked them up and saved them too.  I simply had to trim it down a bit to fit on the newly framed out door and glue and nail it on with finish nails.  The windows have yet to be officially installed, but they fit snuggly enough in the openings that they hold themselves in place for the time being.  Then, just to make sure it fit and looked awesome, we popped it in the trailer.  Voila!  A door!


We plan on covering the edges of the door and the wall opening with thin aluminum trim, but that still needs to be worked out.  In the meantime, I cut some of the aluminum T-molding we ordered on-line to shape around the door edges.  This molding with act a a backer for the weatherstripping and create finished seal around the door.  I attached these temporarily with some nails for the time being, but I have to continue to shave off portions of the door in order to get a tight but still movable fit.  Another test fit with the T-molding on looks great!  There's still more to do, but they are coming along nicely.

hinge side  / door handle side


June 13, 2012

A Little Press

Yesterday was a very exciting day as our trailer project got posted on Tiny House Blog!!  Suffice to say our blog readership went up quite a bit - so I wanted to extend a welcome to all of the new visitors and readers to our little space on the web :)

Our trailer is coming along slowly but surely and I have to admit that the blog a bit behind where we are in reality, but we're working hard to keep things up to speed here.  Hopefully you will all continue join us for the ride as we finish up and begin our adventures out on the road!

~ Rebecca & Darrell

Mt. Rainier National Park ~ August 2011 (next time we'll have our trailer!)

June 7, 2012

Cabin Cabinetry (HA!) and Protecting the Wood

With the galley completed and the wiring run, it was time to start finishing out the cabin with cabinetry and trim.  We started by nailing the back panel on the galley wall to cover up the insulation and wiring for the auxiliary ports.  After doing this, Darrell added one of the small brackets he used on the counter to secure the back wall to the ceiling.  This added some strength to the wall and wouldn't really be seen since it would eventually be inside a cabinet.


The inside cabinet was made in the same way we did the shelving and cabinets in the galley.  We started by adding a shelf made from 1x8 pine to form the bottom of the cabinet.  We saved the diagram I did when measuring up the back and side walls so we knew where the horizontal framing members were to screw into.  This made it easy to locate and attach the shelf with pocket screws.


Since this cabinet will have two shelves, we next added vertical supports on either side of the shelf from the standard 1x2 pine.  These were screwed directly into the sidewalls.  The second shelf was added and attached with pocket screws.


Additional vertical supports were added on either side going up to the ceiling as well as well as in the middle of the shelf.  These middle supports will also be were we attach the frame and doors.


With the cabinet 'frame' done, Darrell used the miter box again to cut out a face frame with the 3/8"x2" pine strips.  I then measured and cut out the doors from the 1/2" birch veneer plywood.  Everything was lined up and installed with self closing hinges and schnazy handles.


Now that all of the all of the cabinetry was completed, it was time to tung oil the entire interior.  We decided to use this instead of polyurethane for a couple of reasons.  The tung oil is a natural product that will help protect the wood and resist water.  Though it won't create the harder, wipeable finish that poly would, it will achieve a similar result while keeping a more natural finish.  After applying two coats, the color of the wood darkened a bit and the grain really popped!  It looks great!


We did the same tung oil treatment to the galley too, applying the oil on all of the walls, floor and cabinets.  The Okoume really darkened, but looks beautiful against the lighter cabinets and dark counter.  The contrast is stunning!  Finish work is almost done!