April 11, 2012

Making things warm


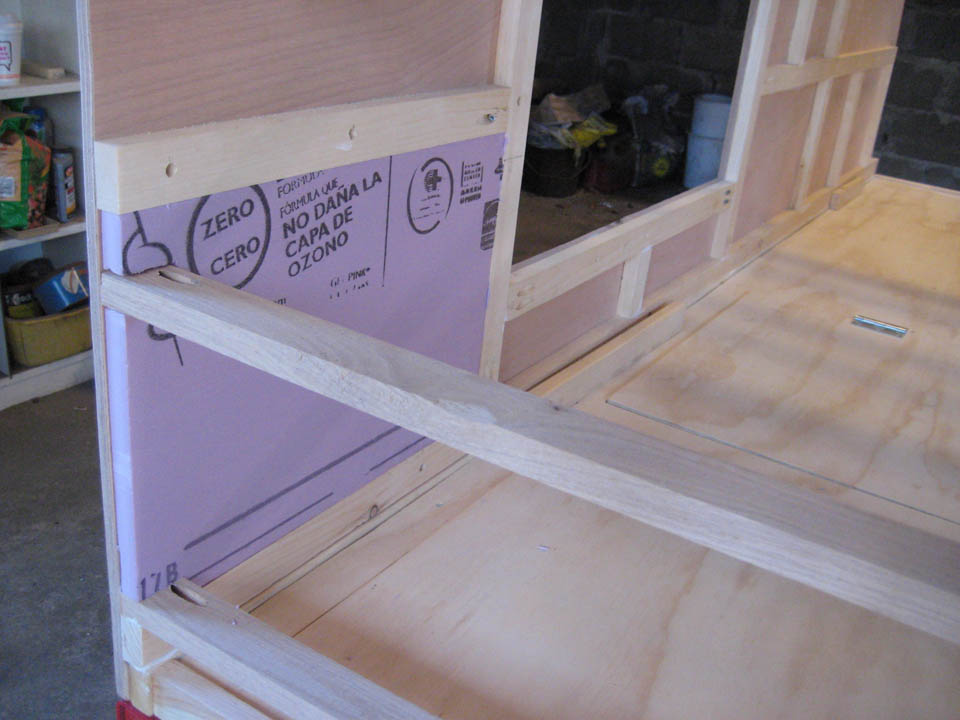
As mentioned in the wall framing post, we decided to insulate the trailer to try and give us some barrier to the elements and allow us to extend the camping season as long as possible.  Using the 1x2 pine boards for the framing gave us a ¾” space to insulate.  After some searching, we found ¾” thick polystyrene rigid foam insulation at Home Depot.  At R-4, it was the highest r-value we found for that thickness in any of the local stores.  It also came in 2’ x 8’ sheets so we only needed to get two sheets for the whole trailer!


Since we were also planning on insulation the roof and hatch, we decided to only insulate the areas of the walls that were going to be inside the cabin.  Cutting the insulation was super easy and the only tricky part was notching around the spars.  Both walls were finished in half a day!


After insulating the walls we were on a role so we decided to try cutting out one of the interior walls.  This was a time consuming process, but relatively easy.  We clipped a 4’x8’ sheet of ¼” birch veneer plywood to the exterior wall and simply traced the outline of the trailer and the door.  Instead of trying to notch out all of the spars, we decided to simply offset the outline of the trailer 1 ½” so that it would run flush to the underside of the spars.  This was done by taking a ruler and simply marking 1 ½” down from the outline we traced and connecting the dots.  Then we used the Jig saw to cut everything out.


The pictures only show the interior walls clamped on, but we ended up using 1” ring shank panel board nails to attach them permanently.  Conveniently they even came in beige so they don’t stand out too much.

Raising the walls

With the walls framed, we were ready to finally make the trailer look like a trailer!  Each of the walls was carefully placed on the trailer frame and held together with temporary support made out of scrap 1x2’s and clamps.


In order to get a more rigid frame, we decided to make the horizontal supports or spars out of 1x2 oak.  We had been using inexpensive pine for the rest of the trailer. Since these spars would be taking most of the stress as we drive down the road, we figured the stronger the better. On each end of the spars, we drilled 2 pocket holes – one on each face of the face of the spar at opposite sides.  This way we could screw into the side walls at two different angles which seemed like a stronger attachment.  We used 1 ¼” screws so that we could get maximum depth without poking out the other side of the Okume.  (Site note – Kreg Jig makes special screws for the pocket holes that come in all sorts of lengths.  You could probably get away with using standard screws, but we decided to play it safe and use their screws.) 


In order to determine the spacing for the spars, we laid everything out in CAD and modified as needed in the field. When we framed the walls, we simply brought the laptop down to the garage and dimensioned it out.  For the most part we tried to keep the spacing around 6”-9”.  This may have been overkill, but it turned out a very rigid structure in the end.


The only spot we had to be extra picky about the spacing was where the fan would be placed.  Most teardrops have a ventilation fan mounted in the ceiling.  We had already ordered one (a VentlineVentadome 12v Fan – it was one of the less expensive ones but also did what we wanted) so we needed to maintain the 14 ¼” x 14 ¼” rough opening.  After laying it out we did a test fit and everything worked out great!

 
Once all of the spars were installed it was time to finally bolt the sidewalls to the trailer.  First we ran a bead of gorilla glue along the wood frame, then set down the walls and lined everything up.  The trailer ended up being a little skewed and was slightly narrower at the front then at the back so we evened up the gaps with wood shims.  Finally we used 1 ½” stainless steel screws spaced 1’’-0” apart to screw directly through the face of the Okume into the wood frame.  We plan on running some sort of trim along the bottom, so having the screws visible didn’t matter.


We didn’t take an overall shot when we were done for the day, but it looked amazing!

March 29, 2012

Framing the walls

After we cut out the shape we started assembling the framing for the walls.  We decided to go with a 'sandwich' style wall so that we would be able to have insulation.  There are other examples we found online where people just used only a single thickness of plywood, but we felt that since we will be camping is possibly inclement weather it would be nice to have more of a barrier to the elements.  So in the end, the 'sandwich' will consist of the ½” exterior Okoume plywood, ¾” x 1 ½” Pine framing, and then ¼” Birch plywood at the interior. This allows us a ¾” space for insulation!


We made the framing process much easier by designing the whole layout in CAD first.  This way we could just bring the laptop out the the garage, throw on some dimensions and cut everything out.  The layout of the framing was determined by first figuring out a rough cabinetry layout.  Each of the verticals will be where a cabinet face will roughly be and the horizontal will be where the counter is... but more on that later.


The framing was secured by first running a bead of glue and then screwing into the ½” plywood.  We used standard ¾” screws which were embedded into the framing ¼”.  We also secured the framing to one another in key spots through the use of pocket screws. This gives us some added structural rigidity and gives us some nice points to secure the cabinetry into.

Rebecca measuring up some framing

Once one side was done, the other was copied.

Darrell sketching out the second side
We then did a dry fit on the ground just to get some idea of how things look - and they look amazing!


Next up, setting the walls on the trailer and the structural framing spars.  It's beginning to look like something now!

March 21, 2012

Cutting the walls

Once we had the shape down and everything was decided on height, thickness, design, etc., we purchased some really nice plywood for the outside walls from a local lumber yard.  We knew we wanted to use marine grade plywood based on the ability for the wood to get wet and not have to worry about rotting or any separation of the veneer.  The main difference between normal plywood and marine grade appears to be a lack of "voids" or knots in the wood which could accumulate water.  The other main difference is that the glue they use to hold it together is more water resistant.  We also knew we wanted a 'pretty' wood that we could either poly or stain.  Based on our requests the lumber yard recommended Okoume, which, though a bit on the pricey side, is gorgeous. 

Okoume - this isn't the wood we purchased, but it looks just the same!

We were very wary at first on cutting this beautiful wood, but the practice on the scrap plywood assured me of my jig saw abilities.  We started by tracing the pattern onto the plywood like Rebecca described in the last post.  I ended up making a second line about an 1/8" outside of the final shape.  This created a band which my jig saw could go between (just in case my skills were a little off).


using the trammels

Overall I think things went well, I learned that I really need to be very careful ad stay close to my desired line.  Though Okoume cuts really easily, sanding is another story and the sheets required a lot of sanding to bring them down to the correct lines and even them up.

The scariest portion of the walls had to be the doors.  There was no cutting larger than I needed and then sanding it - I had to do it right the first time.  No pressure!  We printed out a full size door on paper so that we could position it easily and trace it onto the plywood.  Come to find out apparently my plotter at work does not do a very good job with actually scaling, so the doors ended up being a bit smaller on the paper than they were supposed to be.  But looking at the paper cutout, we actually liked it better than the original.


The biggest problem that I was running into was how to get the jig saw into the plywood to start the door cut.  Usually people utilize a drilled hole to start the jig saw path, but this was not a good option as I wanted to keep the cut-out door in order to have it be my actual door later on.  I solved this problem by utilizing my Craftsman multi-tool which has an osculating saw head.  I plunged this into the four sides of the door prior to inserting the jig saw.  This did leave a bit of a burn mark, but it was sanded out later on.


getting jigg-y with it

Ta-da!  Door openings!  I laid out some of the frame-work on this door opening to get an idea of how things lined up.  It looked perfect!

Testing the shape

Even though we had the shape all drawn up on the cardboard template and loved it, we still wanted to make sure before cutting into the special plywood we bought (more on that later).  Luckily we had a scrap piece of 4x8 plywood we found in the garage that had probably been hanging around for at least 5 years... it was there when we moved in!  

We drew up the form on the plywood using the same method I described in this design post.  To accurately draw out the arcs, we used adjustable trammels that my Dad got us for Christmas.  Trammels are sort of like a compass on a really long stick.  One trammel has a metal point to fix the center of the arc and the second has a pencil holder.  They were really helpful!


After we drew out the shape, it was time to test our skillz with a jig saw.  I took a whirl on this one since it was just a test and it wasn't as hard as I thought it would be!  But I decided when final cutting time came, Darrell would be the one... he's way more patient that me with fine details.

After it was all cut out - it seemed oddly tall.  We decided to try cutting 1-1/2" off the bottom of the shape since they were flat anyway and it somehow made a huge difference!


Now that we are completely satisfied with the shape, the next step is cutting them out for real!  YAY!

Visual learner

I'm really good at visualizing spaces and forms in my head.  I can picture  rooms, elevations, furniture layouts, you name it, before I start designing.  But for some reason I hit a road block with the trailer.  The shape was easy, but as far as the construction of it, I just couldn't picture it and it frustrated me beyond belief.  So like a true architect (or at least one too poor/cheep to buy a better program) I turned to the wonderful world of SketchUp - a super easy, super free 3D design program by Google.  We use it all the time at my job to convey our design ideas to clients without the pain of cardboard models.

Using the program I was able to take what we started in CAD and litterally start building the trailer on the computer.  It's not perfect or exactly what we have outside, but it really helped us get the ball rolling with the finer details of construction. 

It was also really helpful for figuring out how the spars and side wall framing would go together.  By the time I finished the model (minus the doors and galley) I felt much more confident about the build and Darrell and I really had a good base for deciding what to do next.

overall view - minus the doors & galley.

showing the sidewall framing & insulation

side wall with exposed framing & finished sidewall