 |
| The framed out walls and saved door pieces from back in the day! |
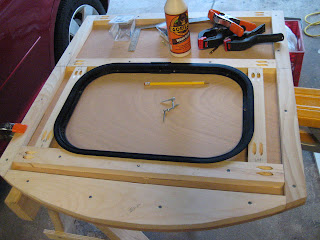
The next step was to frame out the door in the same manner as the side walls - sandwich style. We wanted to insulated the doors as well because we figured that this would give us a nice warm cabin once they were assembled and everything was sealed. I framed out the sides and bottom of the door with 1x2 pine and cut down the arched top piece from a larger 1x4 board. I then used the 1x2 pine again to frame out an opening for the window. We were able to purchase these inexpensive operable screened windows online that were originally made for horse trailers. While not the most attractive in the world, the were the right size, type and price.
I next traced out the opening for the window and drilled holes in each corner to make it easer to cut out with the jig saw. It actually was quite difficult to cut out due to the awkward position and curves, but in the end, with some light sanding it fit like a glove.
After framing out the door, we used the leftover R-4 foam insulation from the walls to insulate the door. It worked out great because we used up exactly what we had left! Its like we planned it!
Just like with the Okoume, when we cut out the openings in the 1/4" birch plywood we used at the interior, we marked them up and saved them too. I simply had to trim it down a bit to fit on the newly framed out door and glue and nail it on with finish nails. The windows have yet to be officially installed, but they fit snuggly enough in the openings that they hold themselves in place for the time being. Then, just to make sure it fit and looked awesome, we popped it in the trailer. Voila! A door!
We plan on covering the edges of the door and the wall opening with thin aluminum trim, but that still needs to be worked out. In the meantime, I cut some of the aluminum T-molding we ordered on-line to shape around the door edges. This molding with act a a backer for the weatherstripping and create finished seal around the door. I attached these temporarily with some nails for the time being, but I have to continue to shave off portions of the door in order to get a tight but still movable fit. Another test fit with the T-molding on looks great! There's still more to do, but they are coming along nicely.
 |
| hinge side / door handle side |


No comments:
Post a Comment